Since there is no need for a stove or oven, the risk of burns or fire-related accidents is minimized, making it safer for young children to participate. Fireless cooking often involves using tools that are safer for kids, such as plastic knives, spoons, and bowls. Working together on recipes encourages teamwork, communication, and sharing. Decorating and arranging food in fun and imaginative ways (like making veggie faces or smoothie designs) stimulates their artistic side. Kids can experiment with different ingredients and create their own recipes, fostering creativity.
Fireless cooking activities not only provide a fun cooking experience but also help kids develop fine motor skills, learn about healthy eating, and enjoy the process of creating their own snacks.
Below are few ideas and detailed recipes for fireless cooking that is perfect for kindergarteners and can be used by older kids as well:
1. Fruit Salad Recipe

Ingredients:
- 1 apple
- 1 banana
- 1 cup grapes (red or green)
- 1 cup strawberries
- 1 orange
- 1 cup pineapple chunks (fresh or canned)
- 1 kiwi
- 1 tablespoon lemon juice
- Optional: 1 tablespoon honey or a sprinkle of cinnamon for extra flavor
Equipment:
- Cutting board
- Child-safe knives
- Large mixing bowl
- Small serving bowls
- Spoon
Instructions:
1. Preparation:
Wash all the fruits thoroughly. This can be a fun activity for the kids to participate in, teaching them the importance of cleanliness.
2. Apple:
Peel the apple if desired. Cut it into quarters, remove the core, and then chop it into small bite-sized pieces. Place the pieces in the large mixing bowl.
3. Banana:
Peel the banana. Let the children slice it into small rounds or half-moons. Add these to the mixing bowl.
4. Grapes:
Cut the grapes in half. If the grapes are large, you can quarter them to make them more bite-sized and safer for young children. Add them to the bowl.
5. Strawberries:
Remove the stems from the strawberries. Let the children cut the strawberries into quarters or smaller pieces if the strawberries are large. Add them to the bowl.
6. Orange:
Peel the orange and separate it into segments. Remove any seeds and cut the segments into smaller pieces if they are large. Add these to the bowl.
7. Pineapple:
If using fresh pineapple, cut off the skin and remove the core, then chop the flesh into small chunks. If using canned pineapple, drain the juice and cut the chunks into smaller pieces if necessary. Add the pineapple to the bowl.
8. Kiwi:
Peel the kiwi and cut it into small bite-sized pieces. Add these to the bowl.
9. Mixing:
Gently toss all the fruit pieces together in the bowl. This is a great time to let the kids use a spoon to mix the fruits together.
10. Lemon Juice:
Drizzle the lemon juice over the mixed fruit. This helps prevent the fruits (like apples and bananas) from browning and adds a bit of tangy flavor.
11. Optional Additions:
If you want to add a bit of sweetness, drizzle honey over the fruit salad and mix gently. A sprinkle of cinnamon can also add an interesting flavor.
12. Serving:
Scoop the fruit salad into small serving bowls for the kids to enjoy.
Tips:
- Encourage the children to identify each fruit and talk about its color, texture, and taste as they prepare the salad.
- For added fun, you can let the kids arrange the fruit pieces into fun shapes or patterns before mixing.
- This fruit salad can be stored in the refrigerator for a couple of days, but it's best enjoyed fresh.
2. Yogurt Parfaits Recipe

Ingredients:
- 2 cups plain or vanilla yogurt
- 1 cup granola
- 1 cup fresh fruits (such as berries, sliced bananas, diced apples, or grapes)
- 1 tablespoon honey (optional)
- 1 tablespoon mini chocolate chips or sprinkles (optional)
Equipment:
- Small cups or bowls
- Spoons
- Measuring cups
- Small bowls for holding fruits and toppings
Instructions:
1. Preparation:
Wash all the fresh fruits thoroughly. This can be a fun activity for the kids to participate in, teaching them the importance of cleanliness.
- Berries: Wash and dry the berries. If using strawberries, hull and slice them.
- Bananas: Peel and slice the bananas.
- Apples: Peel (if desired) and dice the apples into small pieces.
- Grapes: Wash and cut them in half.
2. Setup:
Set up a parfait-making station with bowls of yogurt, granola, prepared fruits, and optional toppings like honey and chocolate chips or sprinkles.
3. Layering:
- Provide each child with a small cup or bowl. Demonstrate how to layer the ingredients to make a parfait.
- First Layer: Spoon a couple of tablespoons of yogurt into the bottom of the cup.
- Second Layer: Add a layer of granola on top of the yogurt (about 1-2 tablespoons).
- Third Layer: Add a layer of fresh fruit on top of the granola (about 1-2 tablespoons).
- Repeat Layers: Continue layering with yogurt, granola, and fruit until the cup is almost full, ending with a yogurt layer on top.
4. Topping:
- Drizzle a small amount of honey on top if desired.
- Add a few mini chocolate chips or sprinkles on top for a fun and colorful finish.
5. Serving:
Give each child a spoon and let them enjoy their homemade yogurt parfait.
Tips:
- Encourage the children to be creative with their layers, making patterns or using their favorite fruits.
- Discuss the colors, textures, and flavors of the different fruits and toppings as they build their parfaits.
- For a nut-free option, ensure that the granola used does not contain nuts.
Nutritional Benefits:
- Yogurt provides calcium and probiotics which are good for digestion.
- Fresh fruits add vitamins, minerals, and fiber.
- Granola adds a crunchy texture and can provide additional fiber and nutrients, depending on the ingredients.
3. Veggie Faces Recipe

Ingredients:
- Whole wheat tortillas or slices of whole grain bread
- Cream cheese, hummus, or another spread (e.g., guacamole)
- Assorted vegetables:
- Cucumber slices
- Cherry tomatoes
- Bell pepper strips (red, yellow, green)
- Baby carrots
- Olives (sliced)
- Broccoli florets
- Radishes (sliced)
- Spinach leaves
- Optional: shredded cheese, raisins, or other small edible decorations
Equipment:
- Plates or cutting boards
- Child-safe knives
- Small bowls for holding the veggies
- Spoons for spreading
Instructions:
1. Preparation:
Wash all the vegetables thoroughly. This can be a fun activity for the kids to participate in, teaching them the importance of cleanliness.
- Prepare the vegetables:
- Cucumber: Slice into thin rounds.
- Cherry tomatoes: Cut in half.
- Bell peppers: Cut into thin strips.
- Baby carrots: Slice into thin rounds or small sticks.
- Olives: Slice into rings.
- Broccoli: Separate into small florets.
- Radishes: Slice into thin rounds.
- Spinach: Leave the leaves whole.
2. Setup:
Set up a veggie face-making station with plates or cutting boards, spreads, and bowls of prepared vegetables.
3. Creating the Base:
- Give each child a tortilla or a slice of bread.
- Help them spread a thin layer of cream cheese, hummus, or another spread evenly over the surface using a spoon or butter knife.
4. Making Veggie Faces:
Encourage the children to create faces using the vegetables. Here are some ideas:
- Eyes: Cucumber slices or cherry tomato halves.
- Nose: Baby carrot sticks or olive rings.
- Mouth: Bell pepper strips or a row of cherry tomato halves.
- Hair: Broccoli florets, spinach leaves, or shredded cheese.
- Ears: Radish slices or small spinach leaves.
- Freckles or Dimples: Raisins or small bits of other vegetables.
5. Assembly:
Let the children arrange the vegetables on their tortilla or bread to create fun and silly faces.
They can use their creativity to make unique designs and patterns.
6. Serving:
Once the veggie faces are complete, let the children admire each other's creations before eating them.
Provide a plate or napkin for each child to place their finished veggie face on.
Tips:
- Discuss the colors, shapes, and textures of the vegetables as the children work on their faces.
- Encourage the kids to name their veggie face characters and tell a story about them.
- If a child is hesitant to try a particular vegetable, encourage them to use it in their design and taste a small piece.
Nutritional Benefits:
- This activity introduces children to a variety of vegetables, promoting healthy eating habits.
- It provides vitamins, minerals, and fiber, contributing to a balanced diet.
4. No-Bake Energy Balls Recipe

Ingredients:
- 1 cup rolled oats
- 1/2 cup peanut butter (or any nut/seed butter)
- 1/3 cup honey (or maple syrup for a vegan option)
- 1/2 cup mini chocolate chips (or dried fruit, like raisins or cranberries)
- 1 teaspoon vanilla extract (optional)
- Pinch of salt (optional)
Equipment:
- Large mixing bowl
- Wooden spoon or spatula
- Measuring cups
- Baking sheet or large plate
- Parchment paper or wax paper
- Small scoop or tablespoon (for portioning)
- Refrigerator
Instructions:
1. Preparation:
Gather all ingredients and equipment. Wash hands thoroughly before starting the activity.
2. Mixing:
- In a large mixing bowl, add 1 cup of rolled oats.
- Add 1/2 cup of peanut butter. Ensure it is well mixed for easy incorporation. If the peanut butter is too thick, microwave it for a few seconds to soften (supervised by an adult).
- Pour in 1/3 cup of honey or maple syrup.
- Add 1/2 cup of mini chocolate chips or dried fruit.
- If using, add 1 teaspoon of vanilla extract and a pinch of salt.
3. Combining Ingredients:
Use a wooden spoon or spatula to mix all the ingredients together until they are well combined. This can be a fun activity for the kids, allowing them to take turns mixing.
4. Forming Balls:
- Once the mixture is well combined, line a baking sheet or large plate with parchment paper or wax paper.
- Use a small scoop or tablespoon to portion out the mixture. Roll each portion into a ball using clean hands. The size can be adjusted according to preference, but generally, they should be about 1 inch in diameter.
- Place each rolled ball onto the lined baking sheet or plate.
5. Chilling:
Once all the balls are formed and placed on the baking sheet, refrigerate them for at least 30 minutes. This helps them firm up and hold their shape.
6. Serving:
After chilling, the no-bake energy balls are ready to eat. Transfer them to a storage container if not serving immediately. They can be stored in the refrigerator for up to a week.
Tips:
- Encourage the children to wash their hands before and after handling the mixture.
- For added fun, allow the kids to customize their energy balls by adding different mix-ins like coconut flakes, chia seeds, or crushed nuts.
- If the mixture is too sticky to handle, lightly wet hands with water or rub a bit of oil on them before rolling the balls.
Nutritional Benefits:
- Oats: Provide fiber and complex carbohydrates for sustained energy.
- Peanut Butter: Offers protein and healthy fats.
- Honey or Maple Syrup: Natural sweeteners that add flavor without refined sugar.
- Chocolate Chips or Dried Fruit: Add a touch of sweetness and extra nutrients like antioxidants.
5. Sandwich Roll-Ups Recipe

Ingredients:
- Whole wheat tortillas or flatbread
- Cream cheese, hummus, or any preferred spread
- Deli slices (turkey, ham, or chicken)
- Cheese slices
- Lettuce leaves
- Optional: sliced cucumbers, bell peppers, shredded carrots, or other favorite veggies
Equipment:
- Plates or cutting boards
- Butter knives or plastic spreaders
- Small bowls for holding veggies and other ingredients
Instructions:
1. Preparation:
Wash all vegetables thoroughly. This can be a fun activity for the kids to participate in, teaching them the importance of cleanliness.
Prepare the vegetables:
- Lettuce: Separate leaves and wash them.
- Cucumbers: Slice into thin rounds.
- Bell peppers: Cut into thin strips.
- Carrots: Shred or cut into thin strips.
2. Setup:
Set up a roll-up making station with plates or cutting boards, spreads, deli slices, cheese slices, lettuce, and other prepared vegetables in small bowls.
3. Spreading:
Give each child a tortilla or flatbread. Help them spread a thin layer of cream cheese, hummus, or another spread evenly over the surface using a butter knife or plastic spreader.
4. Adding Fillings:
Let the children choose their fillings:
- Deli slices: Place one or two slices of deli meat on top of the spread.
- Cheese slices: Add a slice of cheese.
- Lettuce: Place a lettuce leaf on top.
- Veggies: Add a few slices of cucumber, bell pepper strips, or shredded carrots.
5. Rolling Up:
Show the children how to roll up the tortilla or flatbread tightly, starting from one end and rolling to the other end. Encourage them to roll slowly and firmly to keep the fillings inside.
6. Slicing:
Once rolled, help the children cut the roll-up into smaller pieces, about 1-2 inches wide. This step may require adult assistance for safety.
7. Serving:
Place the sliced roll-ups on a plate and serve. The kids can enjoy their colorful and healthy creations immediately.
Tips:
- Discuss the different colors, textures, and flavors of the fillings as the children create their roll-ups.
- Encourage creativity by allowing the kids to mix and match their favorite ingredients.
- If using a spread that is thick, soften it slightly by letting it sit at room temperature for easier spreading.
Nutritional Benefits:
- Whole Wheat Tortillas: Provide fiber and whole grains.
- Cream Cheese or Hummus: Offers a creamy texture and adds protein (especially with hummus).
- Deli Meat and Cheese: Adds protein and calcium.
- Vegetables: Contribute vitamins, minerals, and fiber, promoting a balanced diet.
6. Smoothies Recipe
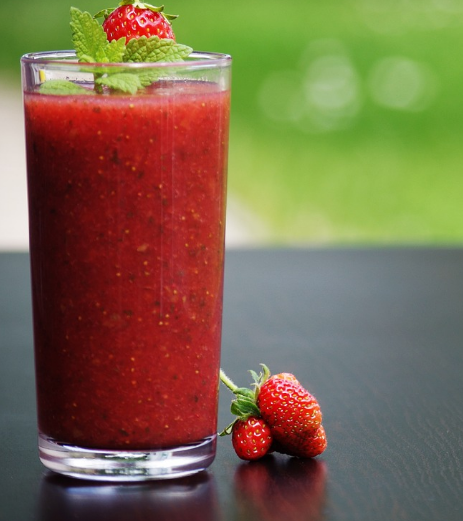
Ingredients:
- 1 cup fresh or frozen fruit (such as strawberries, blueberries, bananas, mango, or pineapple)
- 1 cup yogurt (plain or flavored)
- 1/2 cup juice (such as orange juice, apple juice, or pineapple juice) or milk (dairy or non-dairy)
- 1 tablespoon honey or maple syrup (optional, for added sweetness)
- 1/2 cup ice cubes (optional, for a thicker smoothie)
- Optional add-ins:
- 1 tablespoon chia seeds or flaxseeds
- 1/2 cup spinach leaves (for a green smoothie)
- 1 teaspoon vanilla extract
- 1 tablespoon nut butter (peanut, almond, etc.)
Equipment:
- Blender
- Measuring cups
- Measuring spoons
- Small bowls for holding add-ins
- Cups and straws for serving
Instructions:
1. Preparation:
Wash all fresh fruit thoroughly. This can be a fun activity for the kids to participate in, teaching them the importance of cleanliness.
Prepare the fruits:
- Bananas: Peel and slice into chunks.
- Strawberries: Remove the stems and halve or quarter.
- Mango or Pineapple: Peel and cut into chunks (adult assistance may be required for cutting).
2. Setting Up:
Set up a smoothie-making station with the blender, measuring cups, and all the ingredients in small bowls.
3. Adding Ingredients to the Blender:
Let the children help measure and add the ingredients to the blender:
- Fruit: Add 1 cup of fresh or frozen fruit.
- Yogurt: Add 1 cup of yogurt.
- Juice or Milk: Pour in 1/2 cup of juice or milk.
- Honey or Maple Syrup: If using, add 1 tablespoon for added sweetness.
- Ice Cubes: If desired, add 1/2 cup of ice cubes for a thicker smoothie.
- Optional Add-Ins: Add any additional ingredients such as chia seeds, spinach, vanilla extract, or nut butter.
4. Blending:
- Secure the lid on the blender. An adult should supervise this step.
- Blend on high until all the ingredients are well combined and the smoothie is smooth and creamy. This usually takes about 30-60 seconds.
- If the smoothie is too thick, add a little more juice or milk and blend again. If it’s too thin, add a few more pieces of fruit or a few more ice cubes and blend again.
5. Serving:
Pour the smoothies into cups. Give each child a straw and let them enjoy their homemade smoothie.
Tips:
- Discuss the different colors, flavors, and textures of the fruits and other ingredients as the children add them to the blender.
- Encourage the kids to try different fruit combinations to see what they like best.
- For added fun, let the children name their smoothie creations.
Nutritional Benefits:
- Fruits: Provide vitamins, minerals, and fiber.
- Yogurt: Adds protein, calcium, and probiotics which are good for digestion.
- Juice or Milk: Adds additional vitamins and nutrients.
- Optional Add-Ins: Enhance the nutritional value with healthy fats, proteins, and fiber.
7. Ants on a Log Recipe

Ingredients:
- 4-5 celery stalks
- 1/2 cup peanut butter (or any nut/seed butter like almond butter or sunflower seed butter)
- 1/2 cup raisins
- Optional variations:
- Cream cheese or hummus (for an alternative spread)
- Dried cranberries, chocolate chips, or fresh fruit pieces (for different "ants")
Equipment:
- Cutting board
- Child-safe knife or adult supervision for cutting
- Small spoon or butter knife for spreading
- Small bowls for holding raisins and other toppings
- Plates for serving
Instructions:
1. Preparation:
Wash the celery stalks thoroughly. This can be a fun activity for the kids to participate in, teaching them the importance of cleanliness. Dry the celery stalks with a clean towel or paper towels.
2. Cutting:
Trim the ends of the celery stalks. Cut the celery stalks into 3-4 inch pieces. This step should be supervised by an adult or done with a child-safe knife.
3. Setting Up:
Set up a station with the celery pieces, peanut butter, raisins, and any optional variations in small bowls.
4. Spreading:
Give each child a piece of celery. Let the children use a small spoon or butter knife to spread peanut butter (or alternative spread) into the groove of the celery piece. Make sure the spread is smooth and fills the groove nicely.
5. Adding the "Ants":
After spreading the peanut butter, let the children place raisins (or other toppings) on top of the peanut butter to represent ants. Encourage them to place the raisins in a line or pattern along the length of the celery.
6. Serving:
Once the Ants on a Log are assembled, place them on a plate for serving.
Let the children enjoy their nutritious and fun snack.
Tips:
- Discuss the different textures and flavors of the ingredients as the children prepare their snacks.
- Encourage creativity by allowing the kids to use different spreads and toppings to create their own unique versions of Ants on a Log.
- For a nut-free option, use sunflower seed butter or cream cheese as the spread.
Nutritional Benefits:
- Celery: Provides vitamins, minerals, and fiber.
- Peanut Butter: Adds protein and healthy fats.
- Raisins: Provide natural sweetness and are a good source of vitamins and minerals.
Comments
Post a Comment